
Views: 166
Disclaimer
“This guide is for authorized testing in a controlled environment. Obtain written approval before sending any simulated emails.”
SekurFinCorp: Phishing Simulation (Credential Capture via a Realistic Banking Lure)
In Part 1 we covered installing and configuring GoPhish. This article walks through a complete phishing simulation: building user groups, crafting a realistic email template, importing a cloned login page, launching a campaign, and tracking the results. The goal is to show how urgency-based lures (an “unauthorised crypto transfer” alert) can capture credentials, how GoPhish logs the attack lifecycle, and what remediation steps to take next.
Scenario at a glance
- Target (recipients): Employees of TekLABS (internal user accounts such as
[email protected]). - Real service to impersonate: SekurFinCorp bank — legitimate URL
http://www.sekurfincorp.com. - Phishing domain used:
sekurfincorp.co(close visual match). - Phishing sender address:
[email protected]. - Lure: Alert about an unauthorised fund transfer to a Crypto Wallet — generates urgency and prompts immediate action.
- Campaign name:
SekurFinCorp-User-Awareness-Phishing-Simulation - Target group:
TekLABS(5 users: Ava, Bram, Lina, Tom, Sara)
High-level attack flow
- Compose an email template that looks like a bank alert.
- Use a sending profile (SMTP) to deliver the mail from a convincing sender address.
- Include a tracked link to a cloned SekurFinCorp login page (landing page).
- When the user clicks the link, GoPhish records the click (unique tracking token in the URL).
- If the user submits credentials on the fake login page, GoPhish captures them and shows them in the campaign results.
GoPhish Dashboard – Configuring a Phishing Campaign
1. Groups
Groups in GoPhish is where you add the recipients of a campaign. A Group is a collection of user records (name, email, and optional metadata like department).
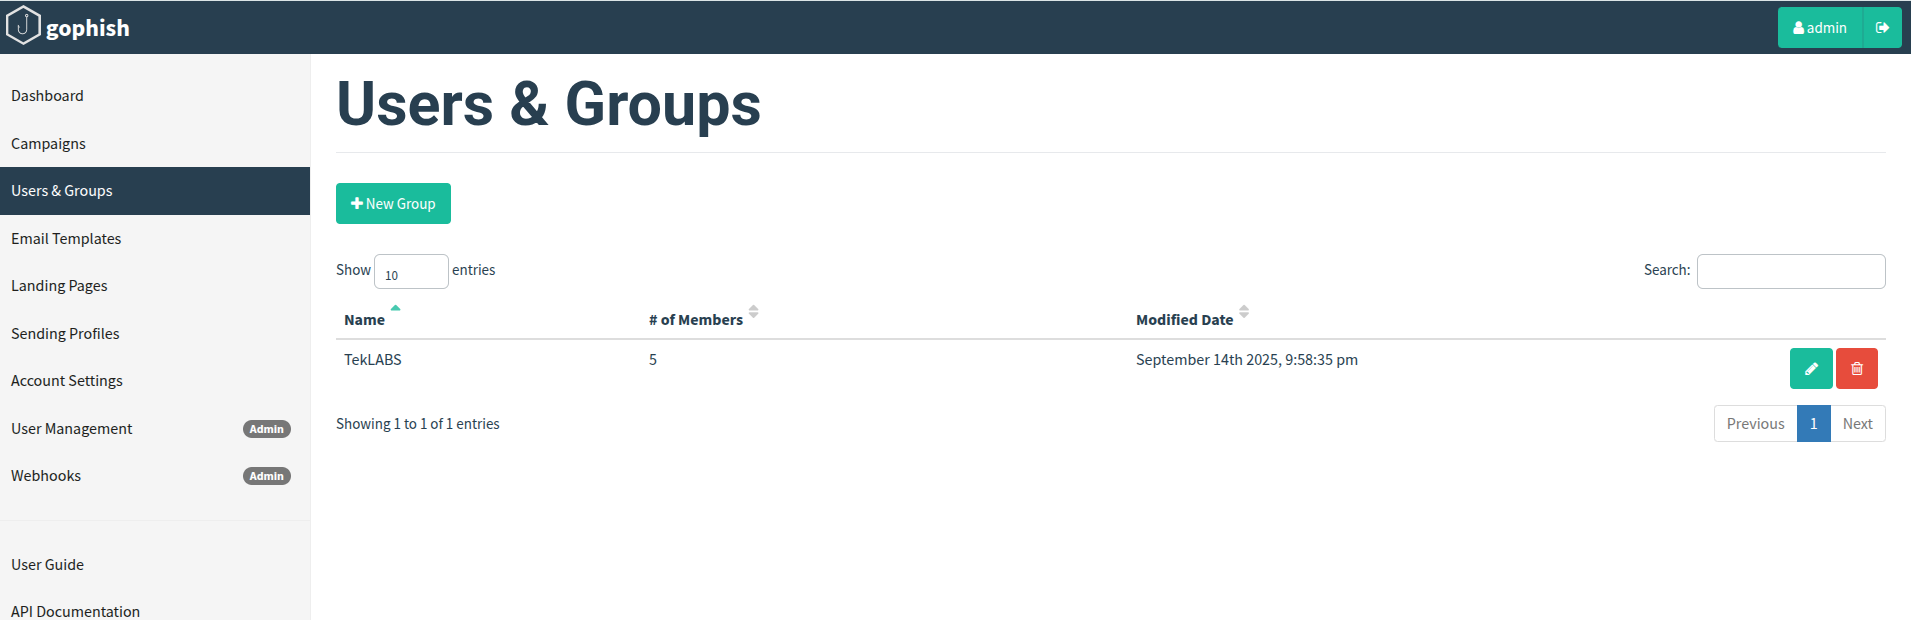
Creating Groups
To create a group, first navigate to the “Users & Groups” page in the navigation menu and click the button “New Group”

Adding Users to the Group
You can add the users to the group in two ways:
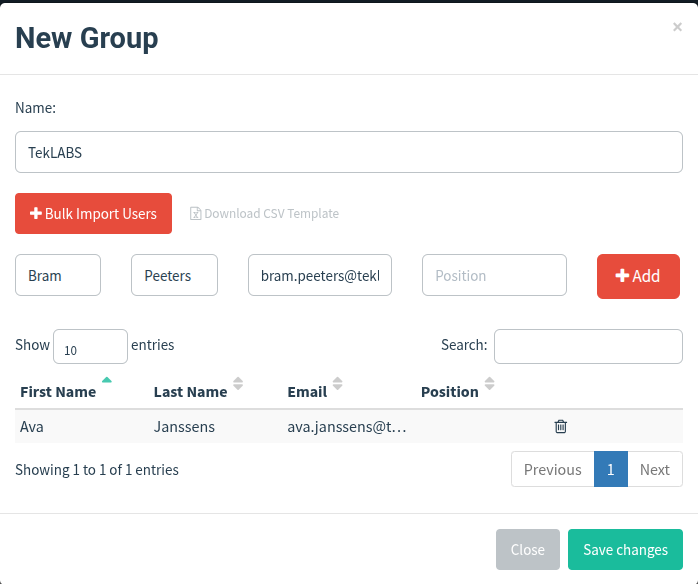
1. Manually Adding Users
To add users manually, fill in the text boxes for “First Name”, “Last Name”, “Email”, and “Position” and click the “Add” button.
2. Bulk Uploading Users
Adding users manually can be a pain. To fix this, Gophish lets you upload users in bulk from a CSV file.
Practical tips
- Accurate email addresses are essential — mistyped addresses waste sends and skew results.
- In real assessments, attacker-controlled lists often come from OSINT, scraping LinkedIn/contact pages, or purchased lists .
2. Email Templates
Email Templates are the phishing messages GoPhish will send. They can be imported from an existing email, or created from scratch. They also support sending attachments.
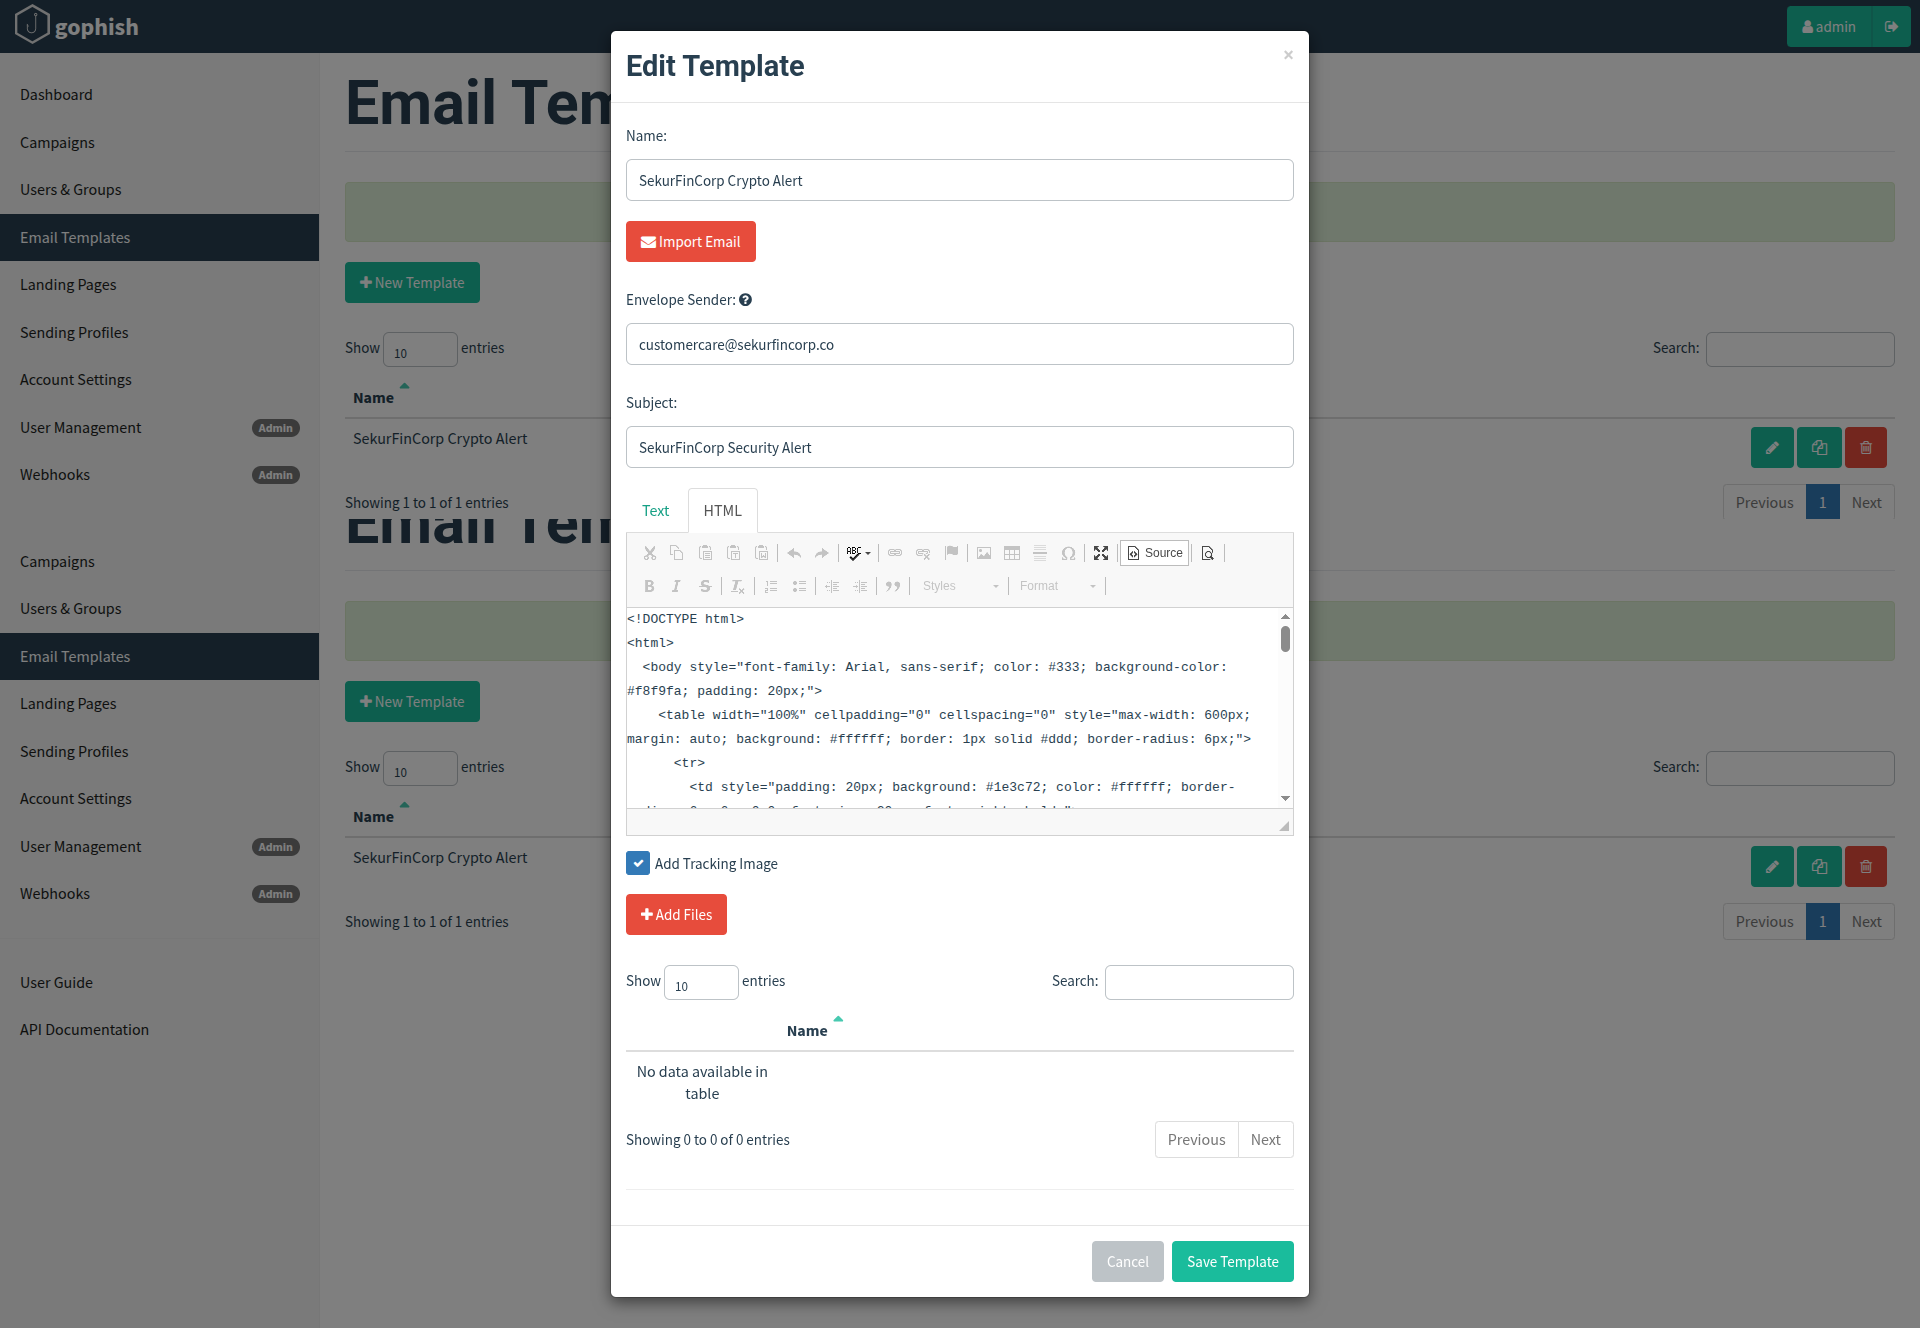
- Go to Email Templates > New Template.
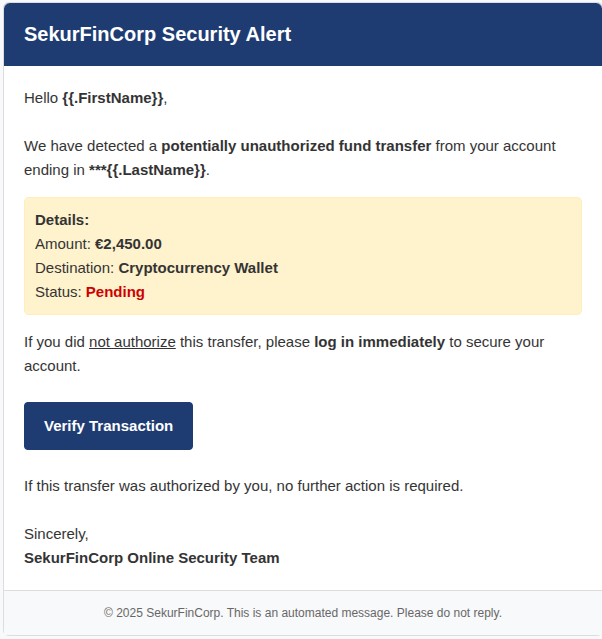
- Name: SekurFinCorp Crypto Alert.
- Subject:
SekurFinCorp Security Alert(this is what users see). - Envelope Sender:
[email protected]— set this explicitly (affects bounce/SMTP envelope). - Body: HTML alert message.
- Usedthe Preview function to verify the email content before sending (optional).
HTML code:
<!DOCTYPE html>
<html>
  <body style="font-family: Arial, sans-serif; color: #333; background-color: #f8f9fa; padding: 20px;">
    <table width="100%" cellpadding="0" cellspacing="0" style="max-width: 600px; margin: auto; background: #ffffff; border: 1px solid #ddd; border-radius: 6px;">
      <tr>
        <td style="padding: 20px; background: #1e3c72; color: #ffffff; border-radius: 6px 6px 0 0; font-size: 20px; font-weight: bold;">
          SekurFinCorp Security Alert
        </td>
      </tr>
      <tr>
        <td style="padding: 20px; font-size: 15px; line-height: 1.6;">
          Hello <strong>{{.FirstName}}</strong>,<br><br>

          We have detected a <strong>potentially unauthorised fund transfer</strong> from your account ending in <strong>***{{.LastName}}</strong>.

          <p style="background:#fff3cd; padding:10px; border-radius:5px; border:1px solid #ffeeba;">
            <strong>Details:</strong><br>
            Amount: <strong>€2,450.00</strong><br>
            Destination: <strong>Cryptocurrency Wallet</strong><br>
            Status: <span style="color:#c00; font-weight:bold;">Pending</span>
          </p>

          If you did <u>not authorize</u> this transfer, please <strong>log in immediately</strong> to secure your account.

          <br><br>
          <a href="http://SekurFinCorp.co/online/verify"
             style="display:inline-block; padding:12px 20px; background:#1e3c72; color:#ffffff; text-decoration:none; border-radius:4px; font-weight:bold;">
             Verify Transaction
          </a>

          <br><br>
          If this transfer was authorized by you, no further action is required.
          <br><br>
          Sincerely,<br>
          <strong>SekurFinCorp Online Security Team</strong>
        </td>
      </tr>
      <tr>
        <td style="padding: 15px; font-size: 12px; color: #666; text-align: center; border-top: 1px solid #ddd; background: #f8f9fa;">
          © 2025 SekurFinCorp. This is an automated message. Please do not reply.
        </td>
      </tr>
    </table>
  </body>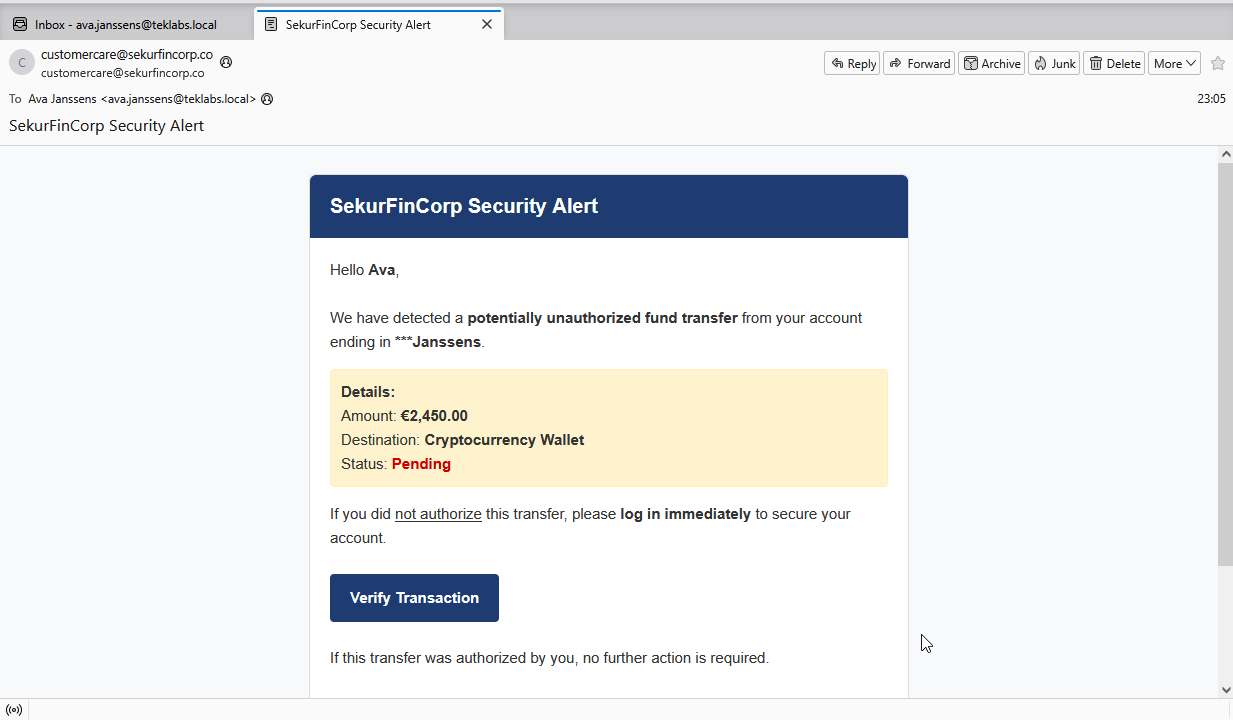
</html>Email Templates accept HTML and template variables (for personalization). The FirstName, LastName values will be fetched from the metadata info stored with the Users/Groups that we have created in Step 1.
Hello {{.FirstName}},The above code block will create a email body meaasage as below:
Important setting — “Add Tracking Image”
- If enabled, GoPhish embeds a small tracking pixel in the email so that an email open event is recorded when the recipient loads remote images.
- Why caution? Modern email clients block remote images by default — so open tracking may undercount opens. Many email clients will prevent the pixel from loading until the user explicitly allows images.
Practical deliverability tips
- Envelope sender vs From header: the envelope sender drives SMTP bounce and certain SPF checks; ensure your sending profile aligns with the envelope domain where possible.
- For higher deliverability, configure SPF/DKIM/DMARC for the sending domain — even in simulations it helps show real-world challenges of spoofing.
- When testing, send a preview to a controlled mailbox to confirm how the template renders across common email clients (Outlook, Gmail, mobile clients).
3. Landing Pages
Landing pages are the actual HTML pages that are returned to the users when they click the phishing links they receive.
Landing pages support templating, capturing credentials, and redirecting users to another website after they submit their credentials.
Note: Landing pages are stored in the database. Gophish generates a unique ID (called the rid parameter) for each recipient in a campaign, and uses this ID to dynamically load the correct landing page.
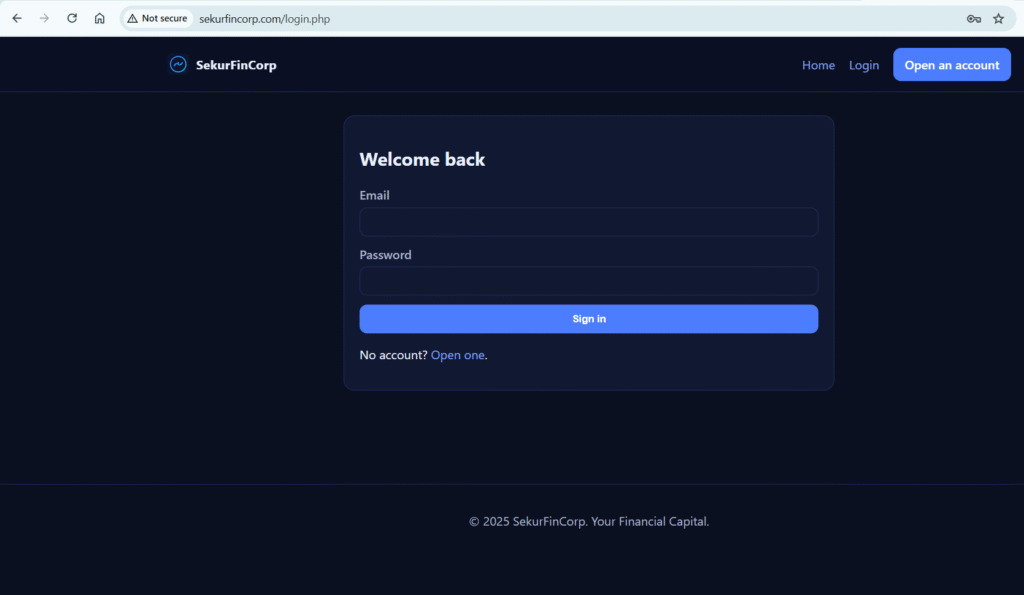
Actual home page of the target phishing domain Sekurfincorp.com.

Login page of the actual Sekurfincorp.com
To create a landing page, click on the “Landing Pages” entry in the sidebar and click the “New Page” button.
Clone the Real Login Page
- In GoPhish, navigate to Landing Pages → click New Page.
- Give it a clear name (e.g., SekurFinCorp Login Page).
- Use Import Site to fetch the legitimate login portal (in my case the URL to fetch is http://www.sekurfincorp.com/login.html).
- GoPhish will automatically pull in the HTML and styling, creating a near-perfect visual copy.
Enable Data Capture
- Check Capture Submitted Data to record entered usernames.
- Optionally, enable Capture Passwords — but confirm this with your engagement scope, as not all clients permit password collection.
- Remember: any captured data is stored in clear text, so handle it responsibly.
Add a Redirect URL
- After the user submits credentials, redirect them to the real WordPress login page.
- This helps maintain the illusion, making the event look like a routine login error or timeout.
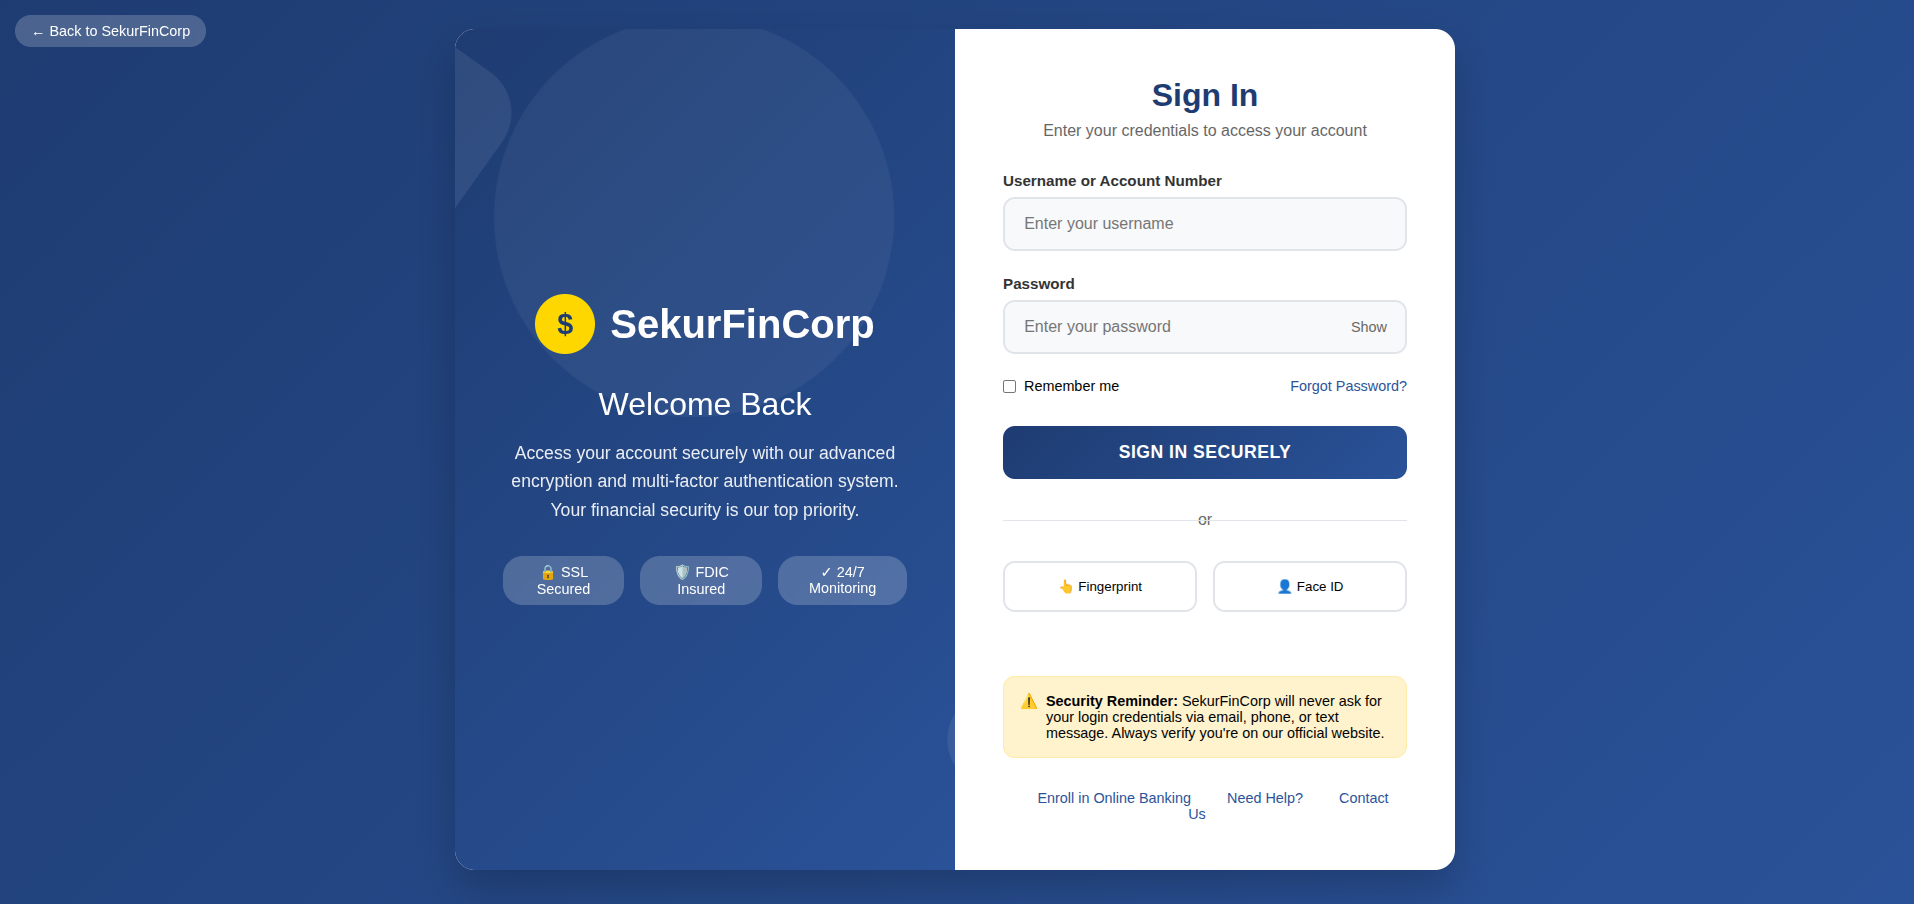
Save and Preview
- Save your landing page, then use Preview to confirm it looks authentic.
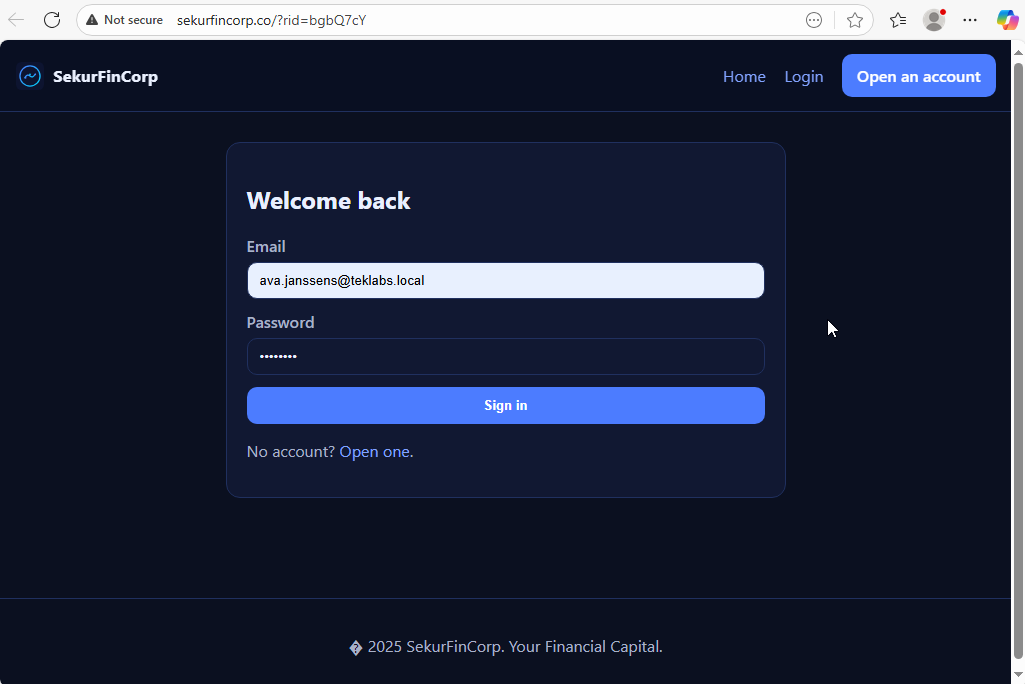
- Double-check that the browser address bar shows your spoofed phishing domain (e.g., sekurfincorp.co) even though the page design matches the real site.
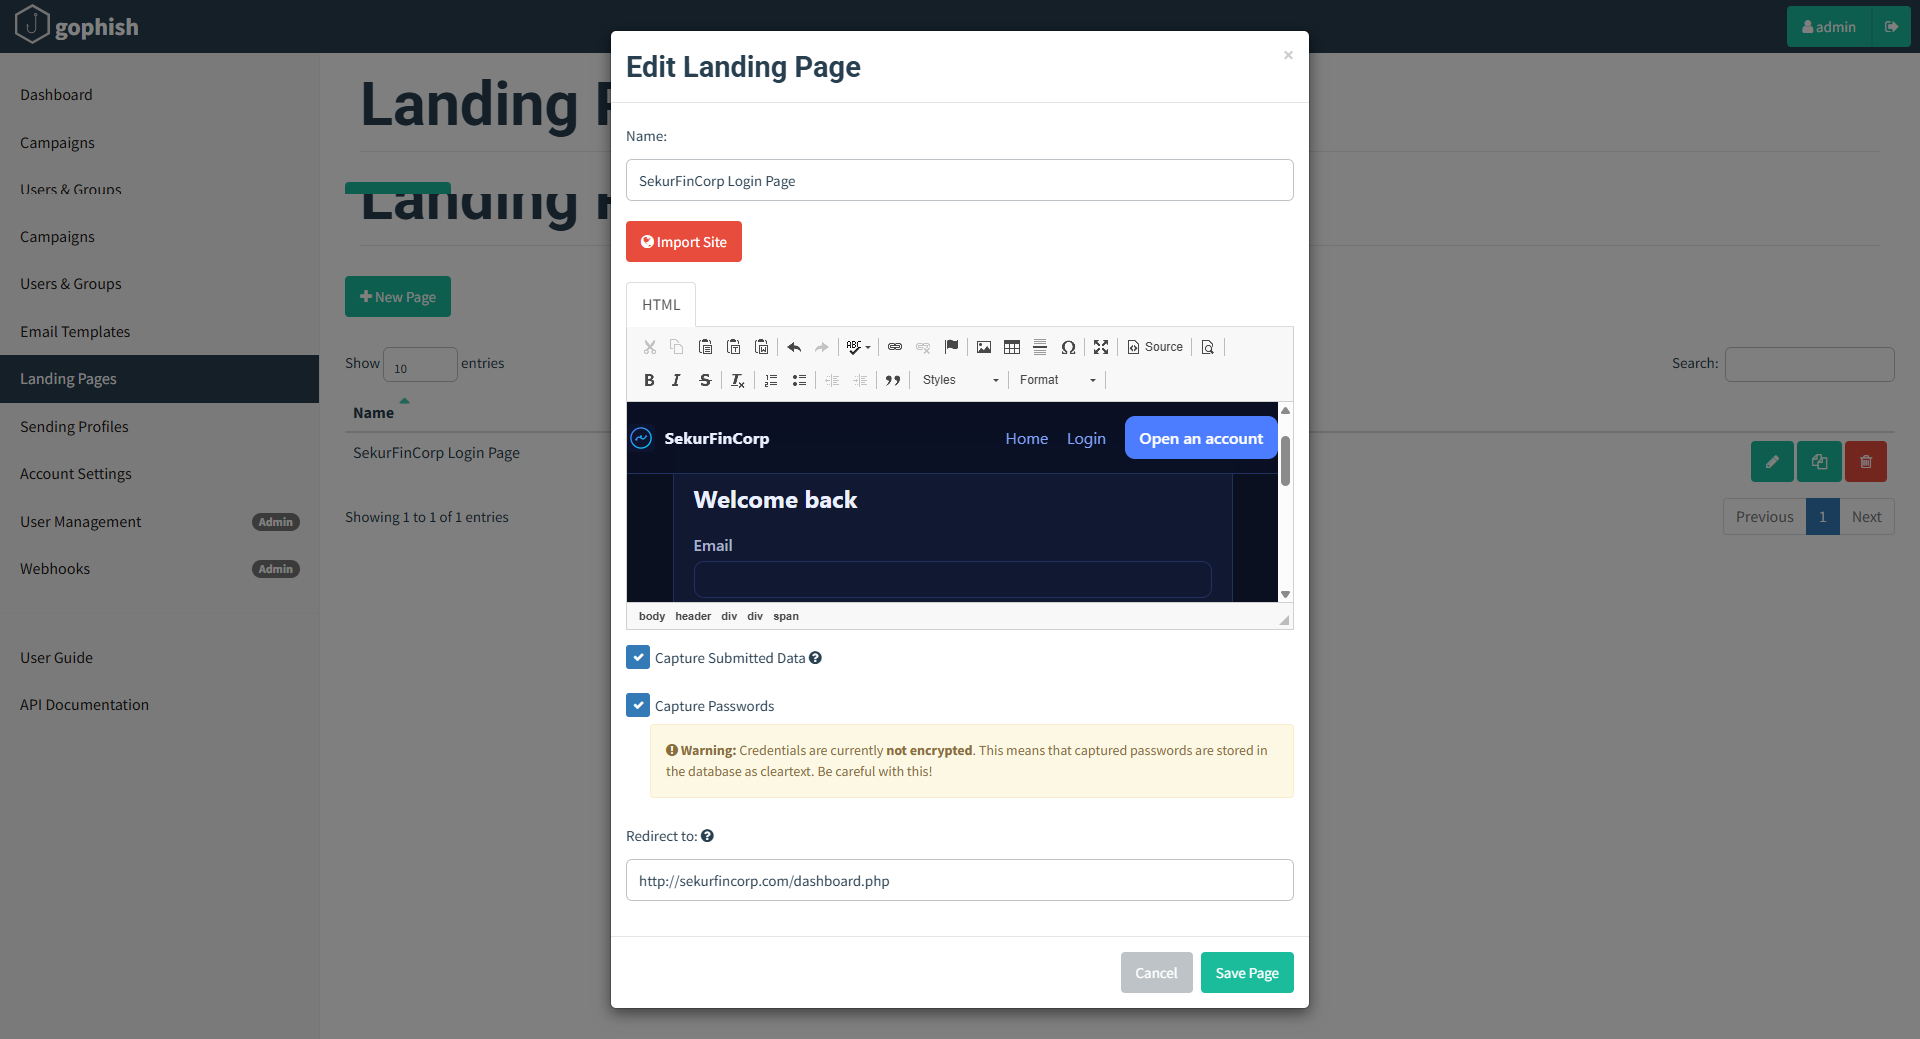
We can clone the existing login page of the actual target using the “Import Site” button.
Preview of the Landing Page:
Tracking and unique URLs
- Each recipient gets a unique tracking token appended to the landing page URL. That token ties the click and submission to the individual user.
- Example (format will vary):
https://sekurfincorp.co/login?id=<unique-token>
- Example (format will vary):
- Why this is important: the unique token allows GoPhish to attribute “link clicked” and “submitted data” events to a specific recipient, not just to an aggregate of hits.
Practical tips
- Keep the captured form fields minimal and clearly labeled so users see a familiar page (username/email + password).
- Never capture unnecessary personal data in training exercises.
- Redirect to a benign page after credentials are submitted so the page flow feels real to the user (reduces immediate suspicion and reproduces real attacker behavior).
4. Sending Profiles
To send emails, Gophish requires you to configure SMTP relay details called “Sending Profiles”. A Sending Profile in GoPhish defines how the platform will send messages — the SMTP host, port, TLS setting, username/password, and the sender address used in the message.
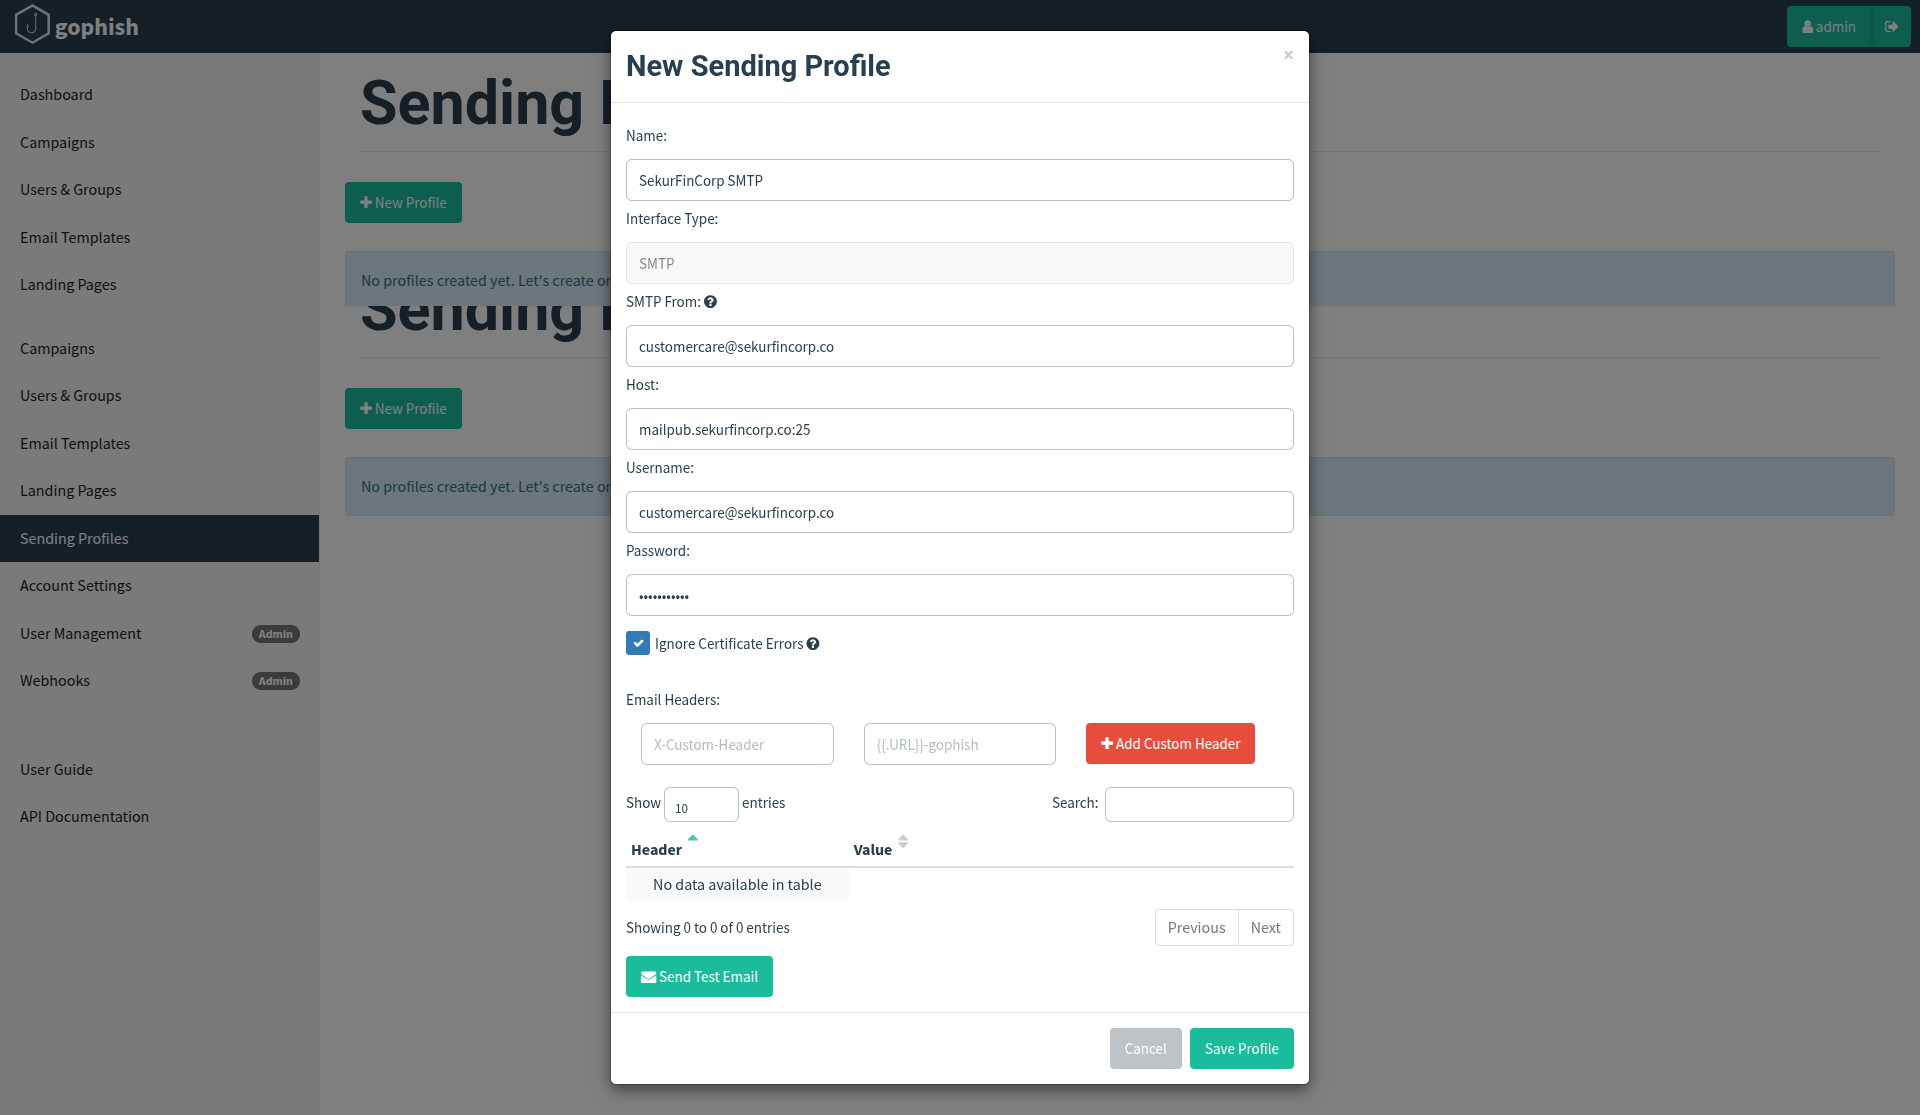
To setup a sending profile, click the “Sending Profiles” navigation entry in the sidebar and click the “New Profile” button.
- Go to Sending Profiles > New Profile.
- Profile Name: SekurFinCorp SMTP.
- SMTP Server:
mailpub.sekurfincorp.co - Sender Address:
[email protected]
(Note: the envelope sender can differ from the visible From header; validate both fields.) - Authentication: if your SMTP relay requires credentials, configure them here and test the connection.
- Use the Send Test Email button to send a sample message to a test mailbox — verify delivery and rendering.
Practical tips
- If the SMTP server rejects messages or the server is misconfigured, campaigns will not go out — always test.
- Aligning SPF/DKIM with the sending domain improves deliverability and demonstrates how attackers might bypass simple defenses.
5. Launch the Campaign
Gophish is centered around launching campaigns. This involves sending emails to one or more groups and monitoring for opened emails, clicked links, or submitted credentials.
A Campaign ties together: Group (recipients), Email Template, Landing Page, Sending Profile, and scheduling options. Launching the campaign sends the emails according to the schedule and settings.
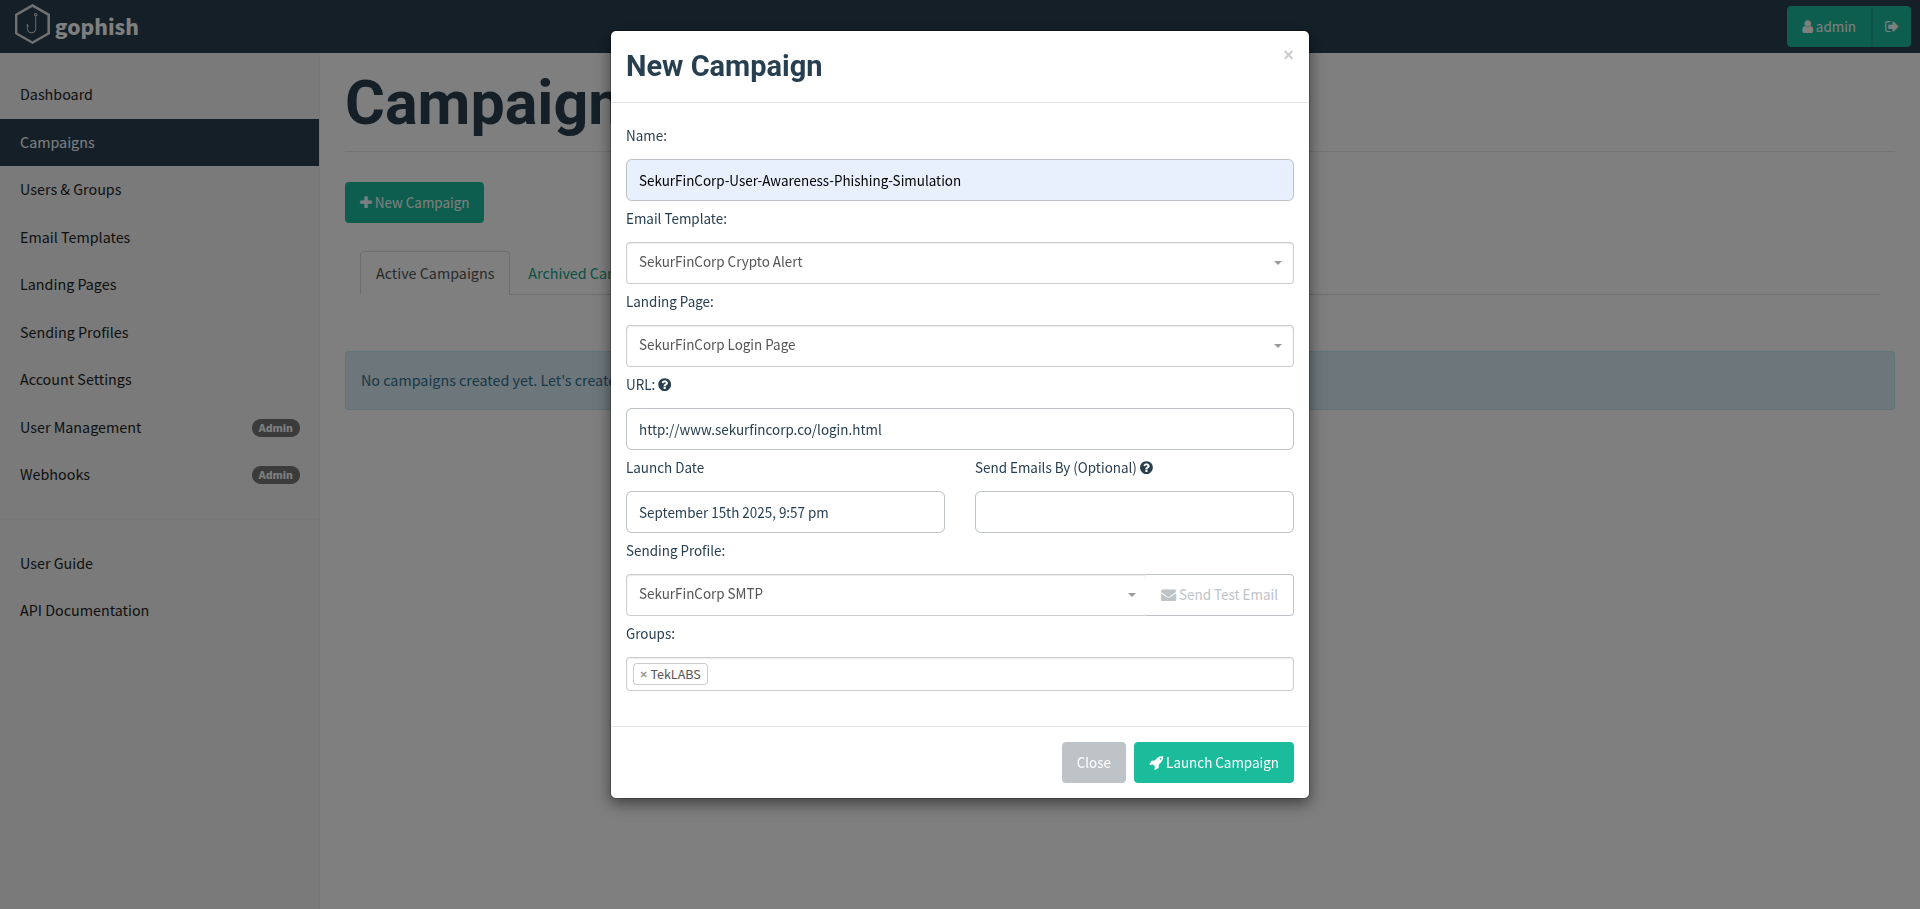
- Go to Campaigns > New Campaign.
- Campaign Name: SekurFinCorp-User-Awareness-Phishing-Simulation
- Select the TekLABS group.
- Choose SekurFinCorp Crypto Alert (email template).
- Choose the SekurFinCorp login page landing page and set the URL domain to
sekurfincorp.co. - Choose the SekurFinCorp SMTP sending profile.
- Scheduling: I launched immediately (option to schedule is available).
- Launch the campaign.

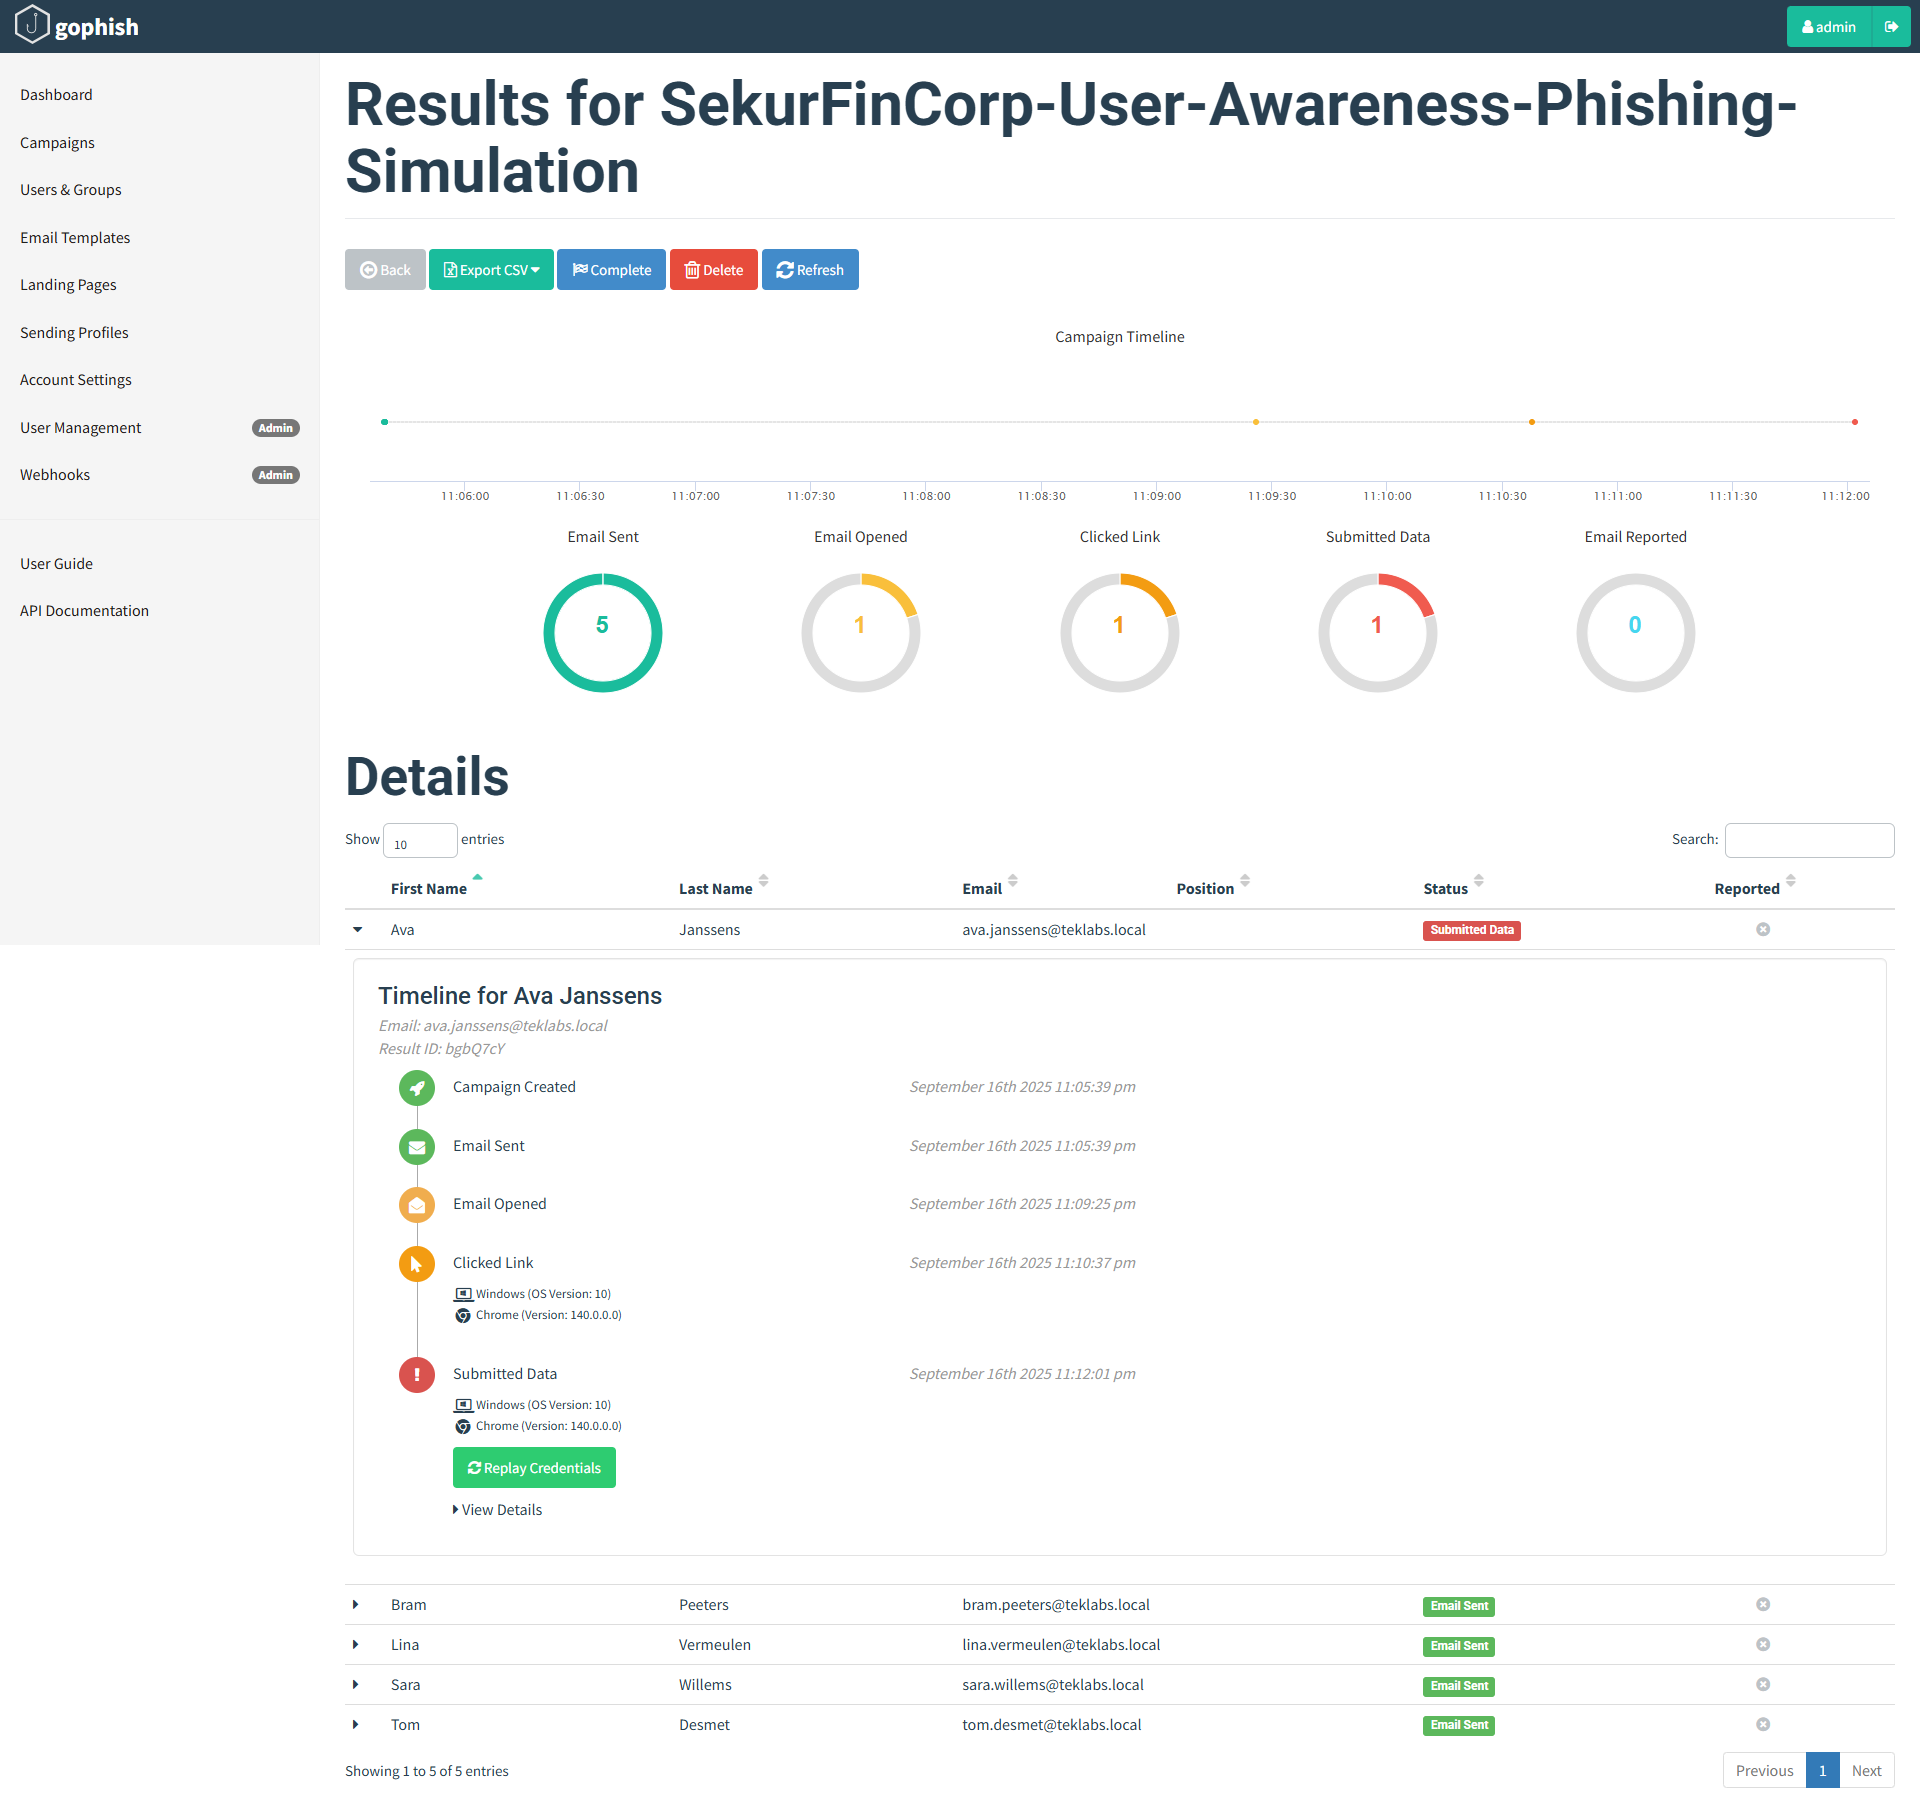
We can track the propgress of the campaign from the Campaign Results page.
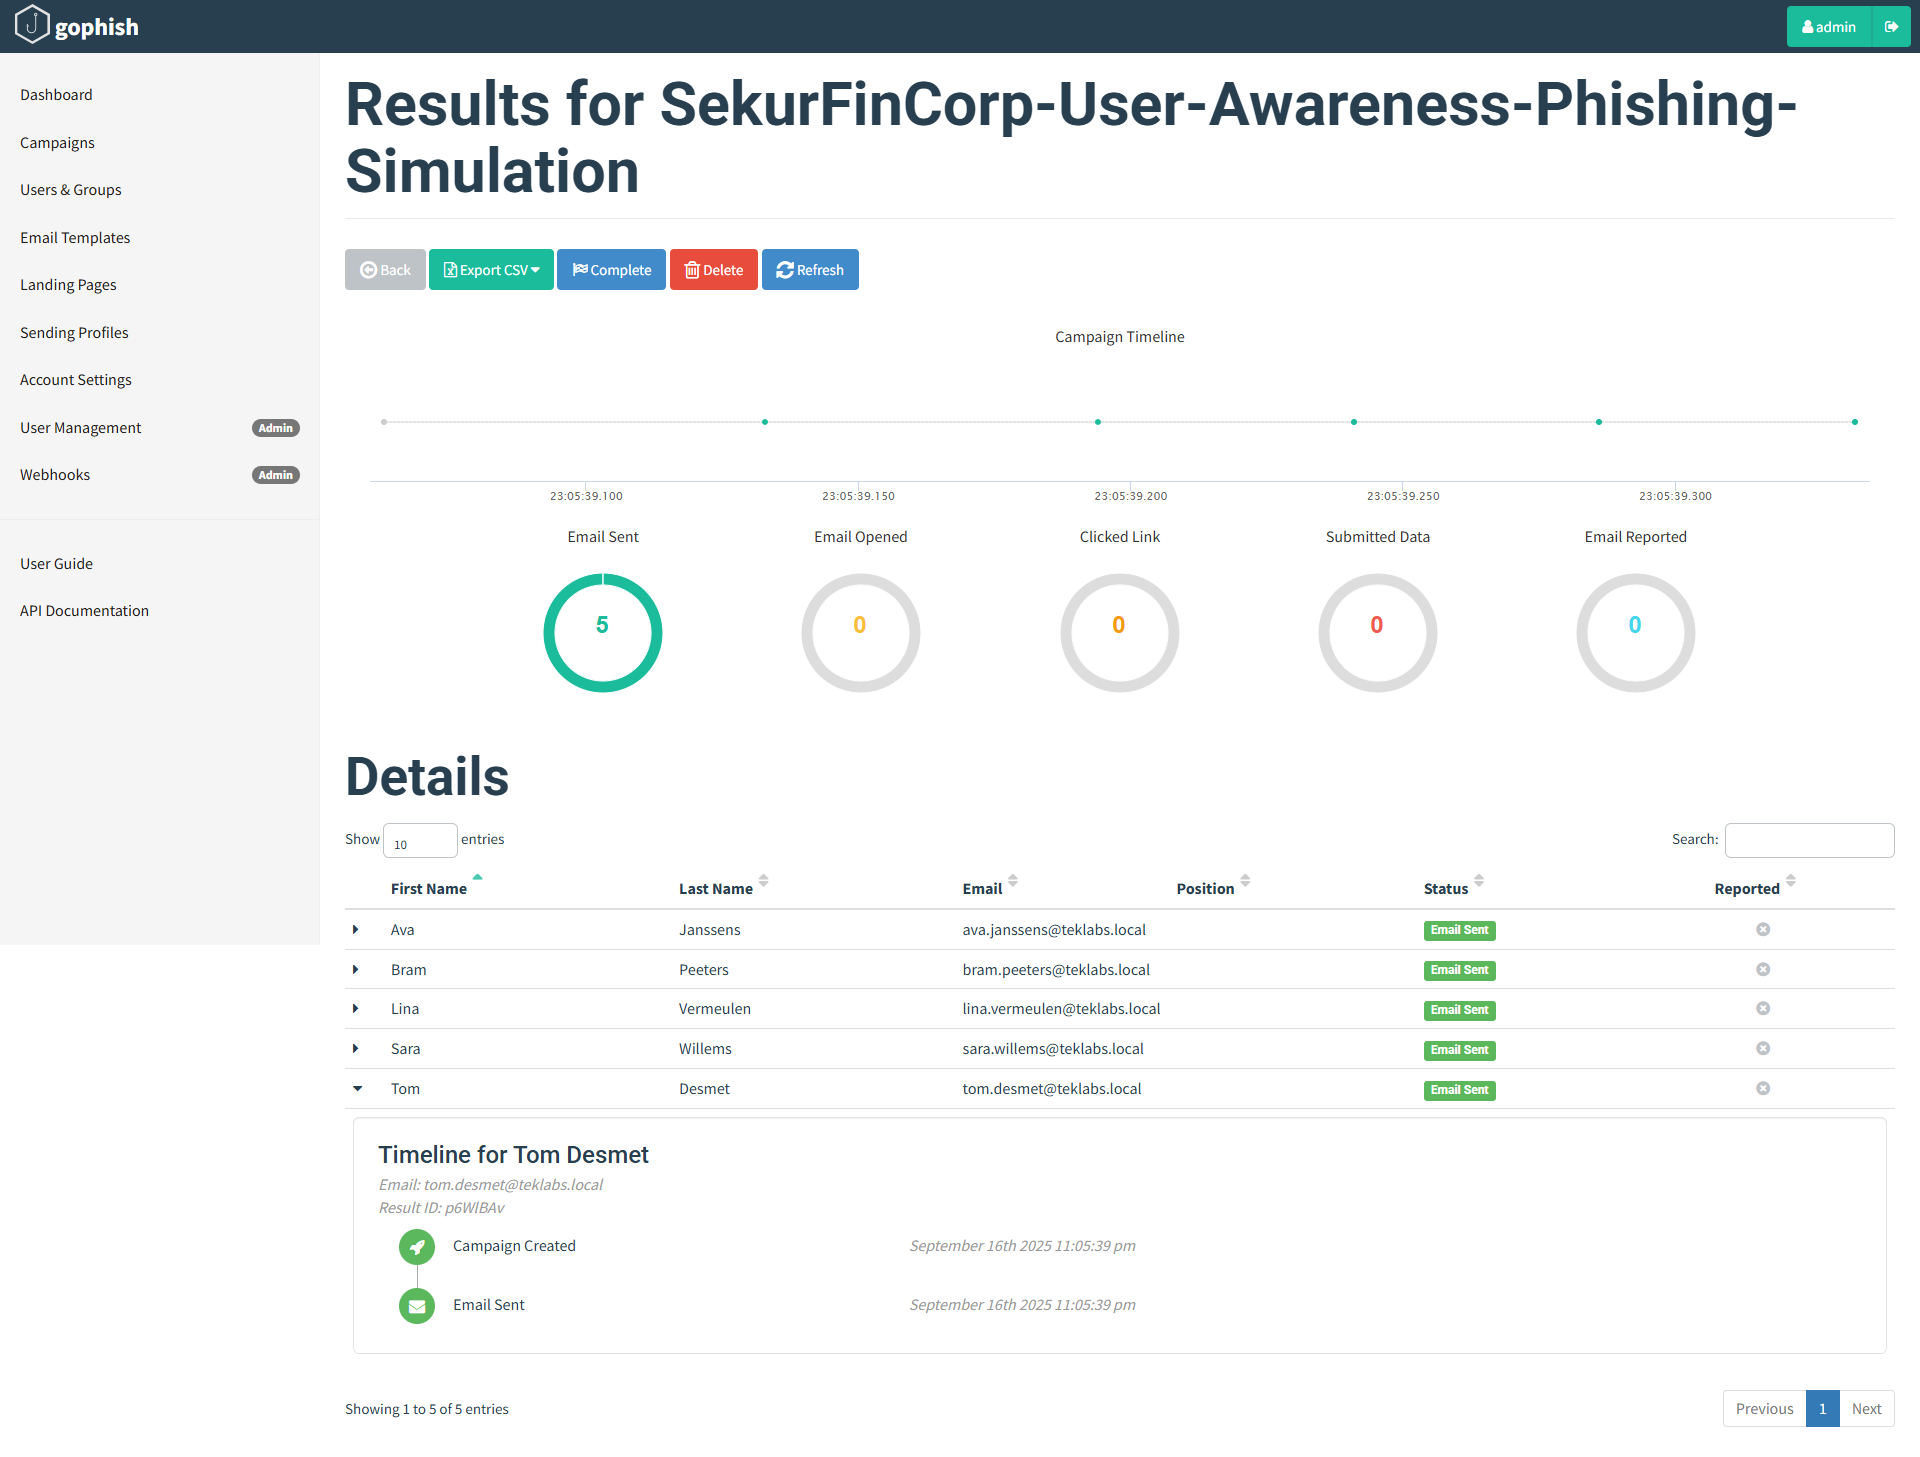
Campaign Results
When the campaign begins, GoPhish tracks a few key metrics:
- Email Sent — number of mails delivered by the sending profile.
- Email Opened — recorded when the tracking image is loaded (limited by email client image blocking).
- Link Clicked — recorded when the user clicks the tracked URL (very reliable).
- Submitted Data — recorded when the user posts credentials into the landing page.
- Email Reported — if the recipient uses a reporting mechanism (sends to security team / uses “Report Phish” button).
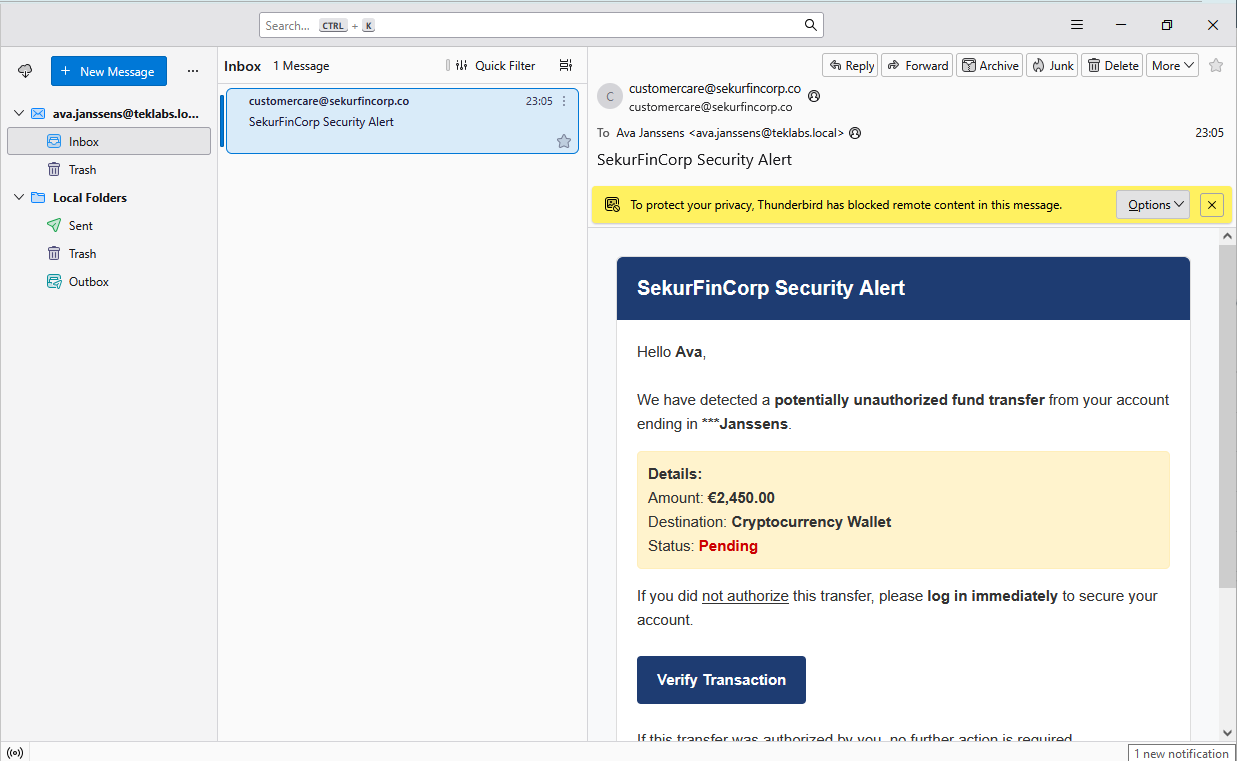
Below we step through the victim’s actions and the corresponding updates recorded by GoPhish. For this demo we sign in to the workstation as [email protected], open the phishing message, click the link, and submit credentials — each action is reflected live in the campaign results.
User received the Phishing email:
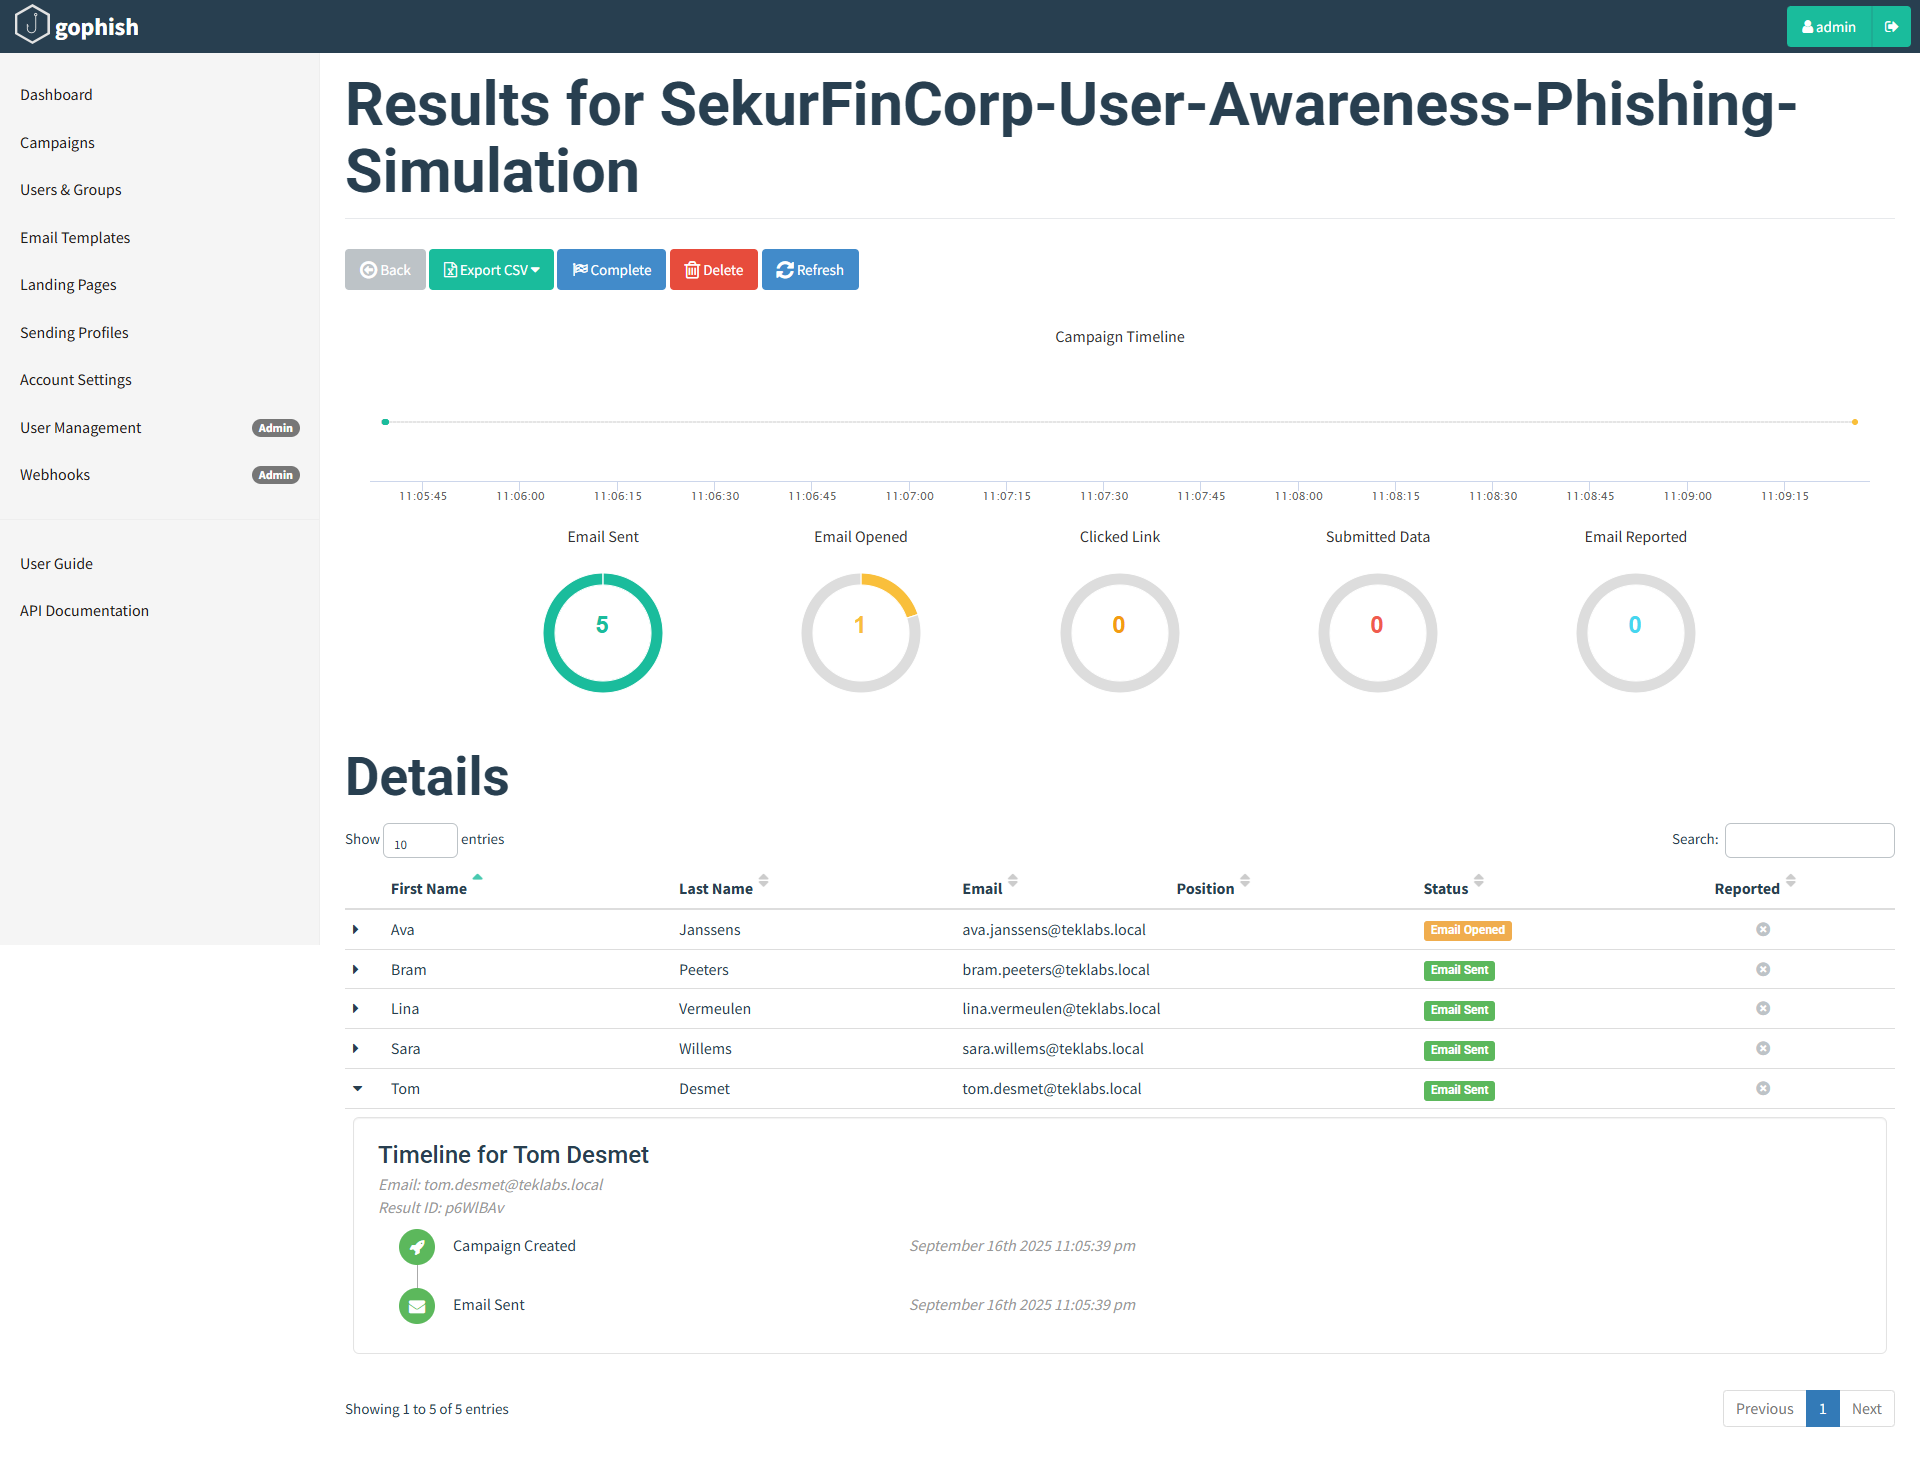
User opened the email:
Compaign Status
User Clicked on the Phishing link “Verify Transaction”. This will take the user to the fake/phishing site:
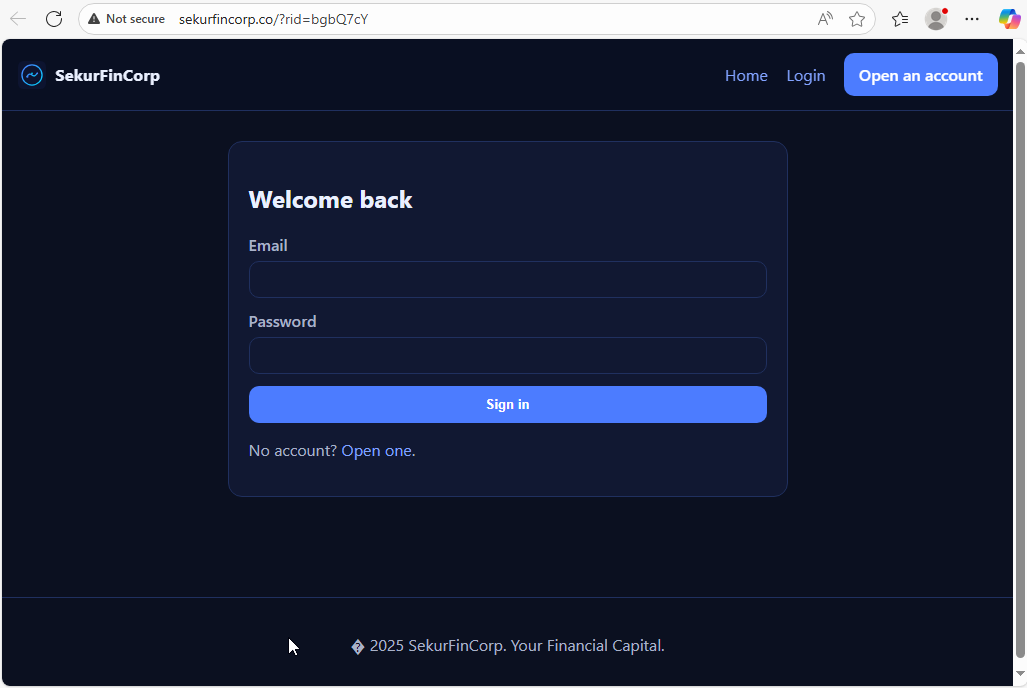
Inspect the URL. It has the phishing domain (.co) and unique trqcker id.
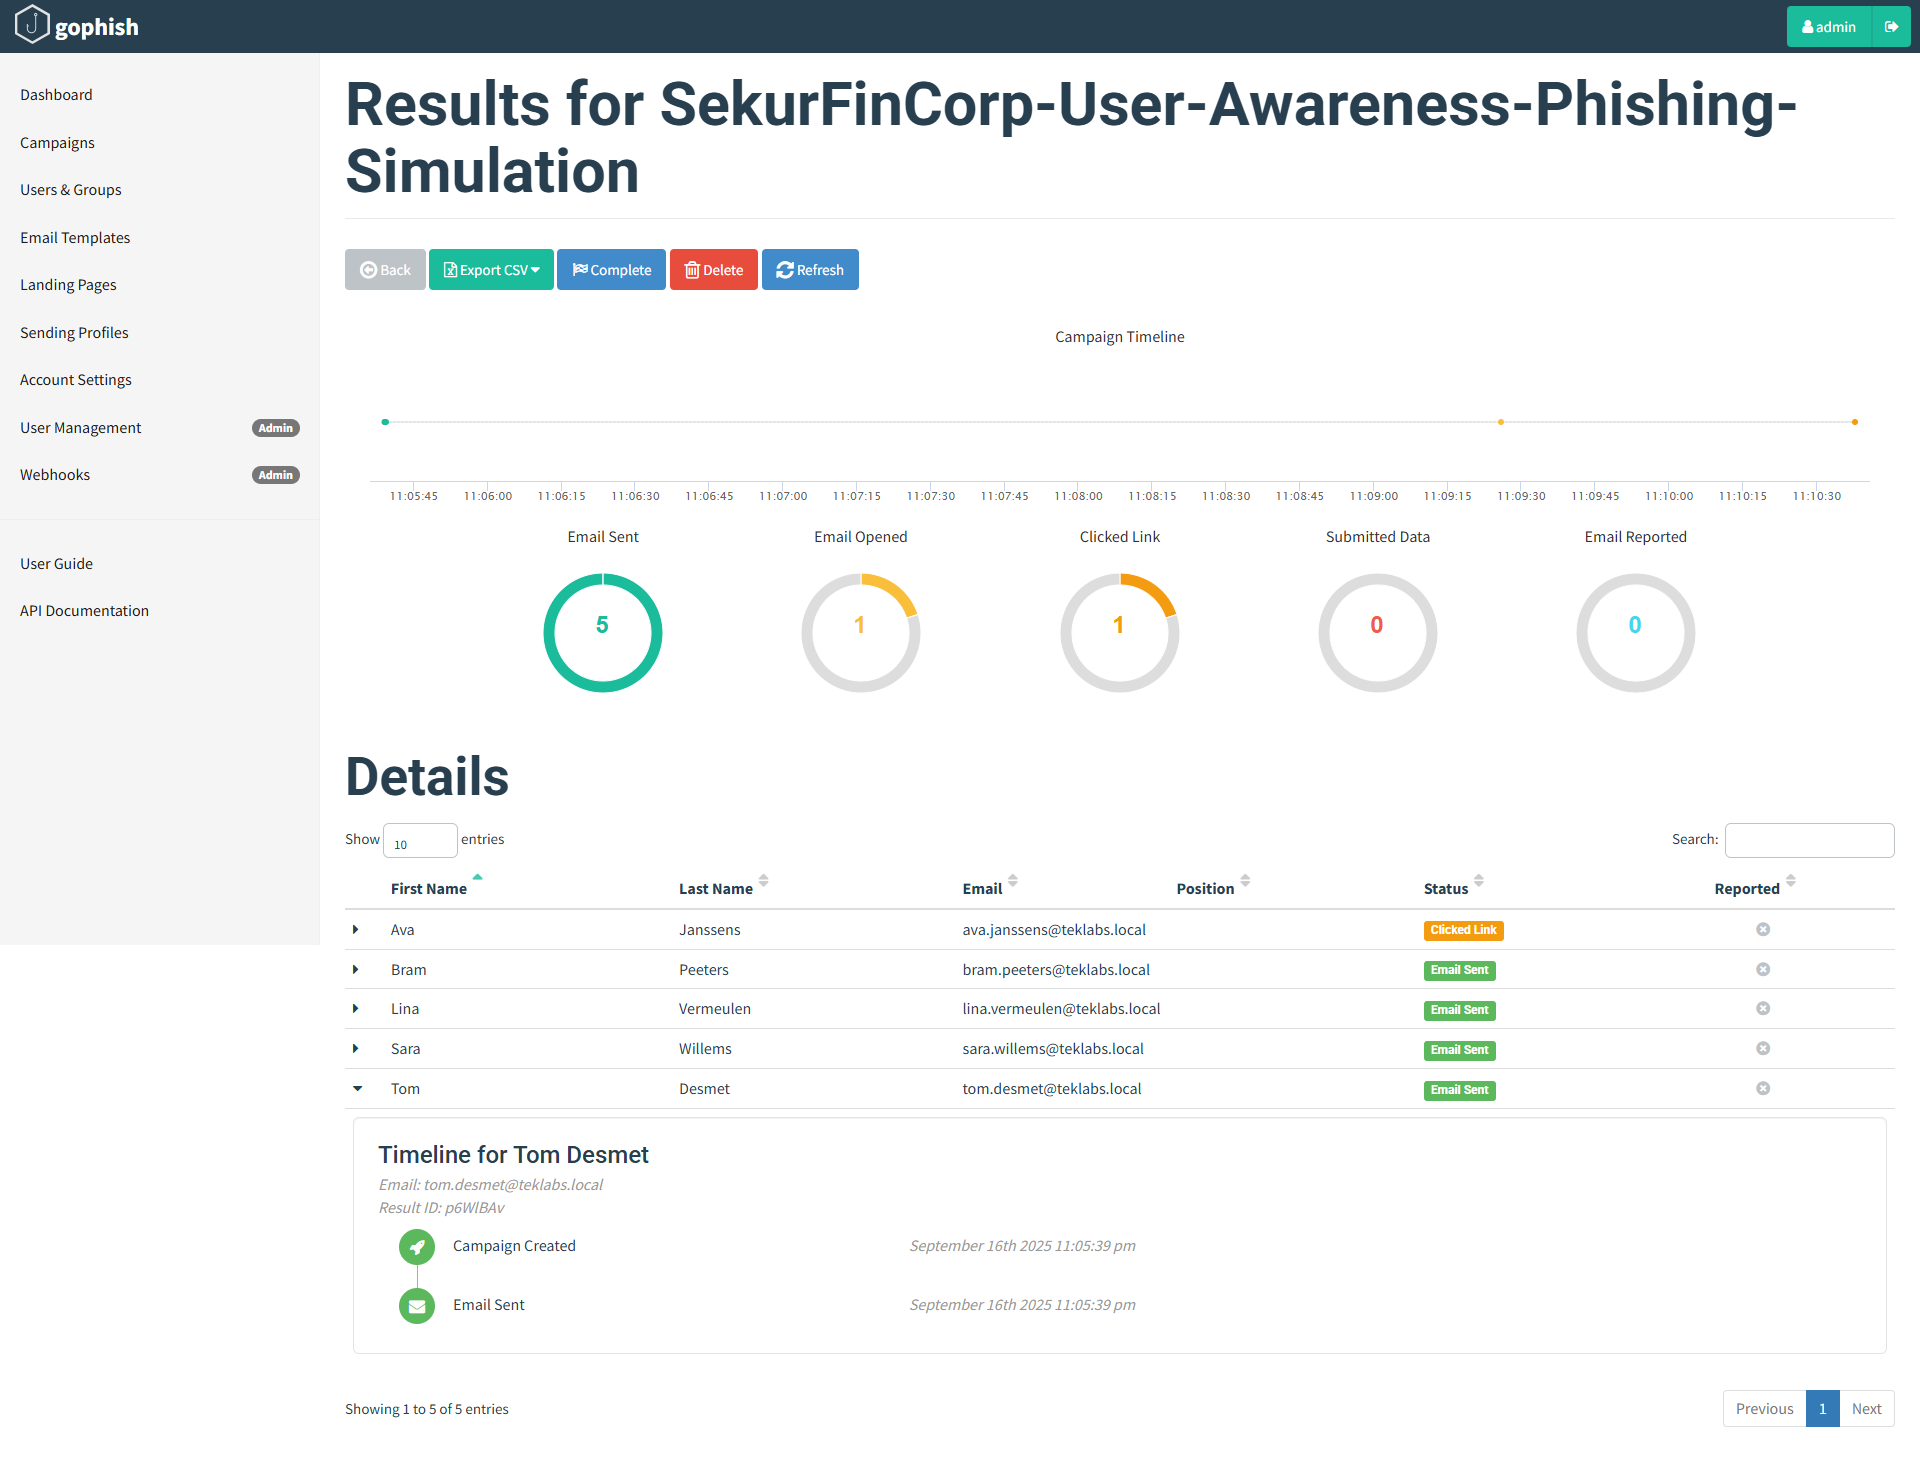
Campaign status now:
Finally the user enters his/her bank login credentials on the fake website:
Campaign Status reflects this with Submitted Data count changed to 1:
Credentials Captured by GoPhish:
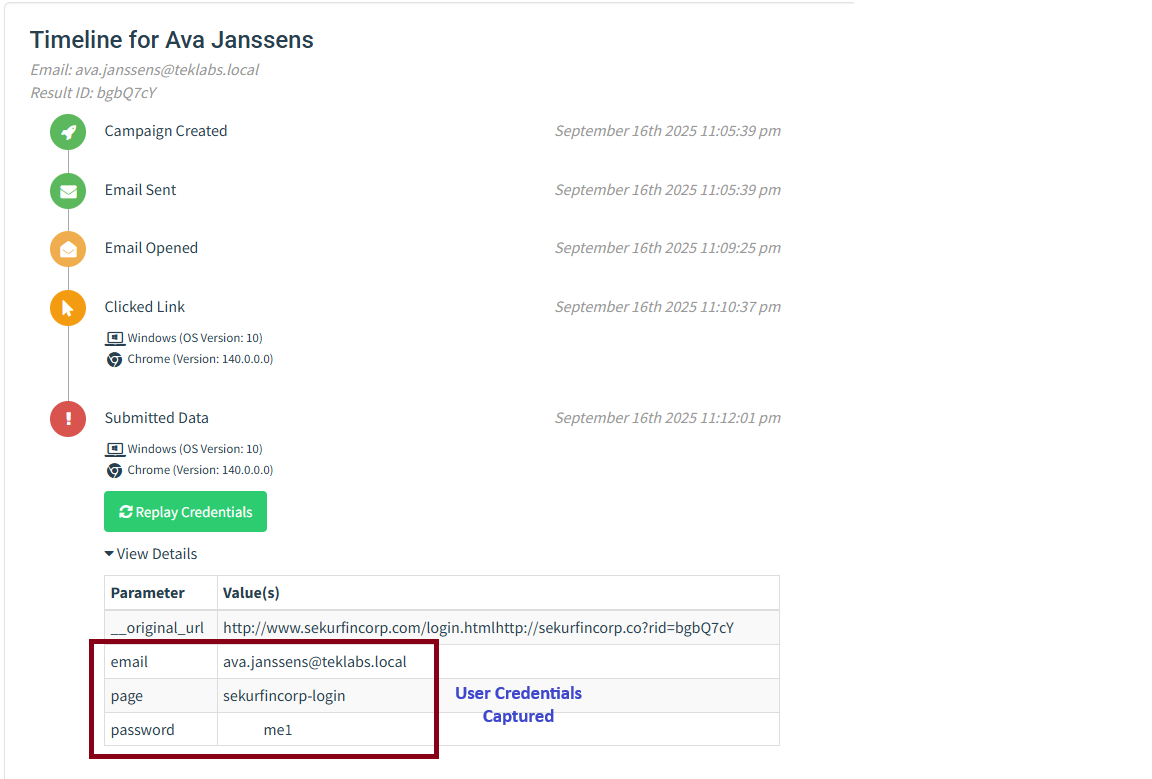
Now, we have the credentials of the user Ava Jannsens. Here we stop this simulation excercise.
Through this demonstration we illustrated how a convincingly tailored phishing email — combining urgency, a believable sender, and a realistic login page — can trick a user into revealing credentials. Stolen credentials are a powerful enabler for attackers: reused passwords or absent/weak MFA can turn a single click into account takeover, lateral movement, and ultimately a full breach. Tools like GoPhish allow security teams to reproduce these attack paths in a measurable way, so organisations can identify risks, remediate quickly, and build targeted awareness programs that reduce real-world success rates.
Phishing remains the single most effective initial-access technique used by real attackers because it targets the human element — stolen credentials and a single clicked link can quickly lead to account takeover, lateral movement, ransomware, business-email-compromise, and large-scale data loss.
- Attackers exploit urgency and fear (unauthorised transfer to crypto wallet). These emotions reduce deliberate decision-making.
- Using work email for personal registrations increases exposure — if a work address is reused on other services and a credential leaks, attackers can pivot back to corporate assets.
- Training should focus on the behaviour (spotting social-engineering cues, checking URLs, not reusing passwords) rather than shaming.
One of the most dangerous follow-on effects of a successful phishing attack is password reuse. If a victim reuses the same password across multiple services (personal banking, cloud mail, VPN, SSO), a single captured credential can be used by an attacker to move laterally and escalate access across systems. Attackers automate this with credential-stuffing and password-spray techniques: they take leaked passwords and try them at scale against corporate portals, email, and remote access services. That means a momentary lapse — answering an urgent bank alert with the same password you use for work — can quickly turn into account takeover, data exfiltration, or ransomware deployment.
Quick Mitigations
- Use unique, strong passwords for every account (passphrases or long random passwords).
- Adopt a password manager so users don’t need to remember or reuse passwords.
- Enforce multi-factor authentication (MFA) for all high-risk services (email, VPN, SSO). Prefer phishing-resistant MFA (security keys) where possible.
- Monitor for credential leaks (breach notification services / automated dark-web scanning) and force resets if a corporate address appears in a breach.
- Implement rate-limiting and anomaly detection on authentication endpoints to slow credential-stuffing attacks and flag suspicious sign-ins.
- Move to SSO with strong policies and centralized session controls so compromised passwords can be quickly invalidated.
Ethics & operational tips
- Always get legal/management approval and define a scope before running simulations on real employees.
- Provide clear post-campaign communication that explains purpose, timing, and steps employees should take if they fell for the simulation.
- Avoid collecting more PII than necessary. Securely store or delete captured credentials after use; never publish them.
What comes next
In the next installment I’ll demonstrate how attackers can chain a successful phishing credential capture into an initial access vector using tools such as Evilginx (session cookie capture / reverse proxy techniques). Stay Tuned!